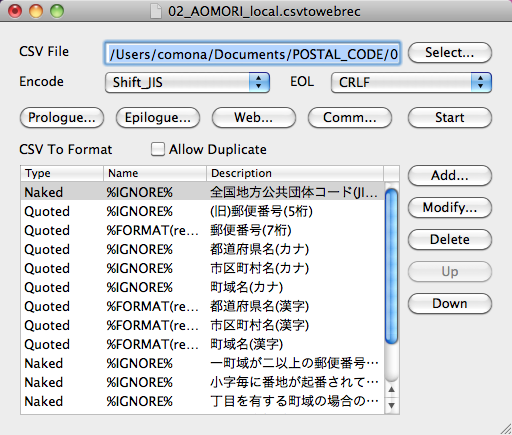
Main Window
The Main Window of CsvToWebRec looks like following.
  • Set the target CSV file path into CSV File text field. You can also choose with Select button and file dialog will shows up.
  • Set character encode with Encode popup menu.
  • Set EOL character with EOL popup menu.
  • Choose Prologue button to setup Prologue.
  • Choose Epilogue button to setup Epilogue.
  • Choose Web button to setup Web Settings.
  • Choose Comm button to setup Communication Settings.
  • Choose Start button to start CSV file upload.
  • Allow duplicate checkbox allows you to use same name for CSV file column name describe later in this page.
  •  
  • CSV to Foramt text view makes relation of CSV records column and send reuest parameter to Web server. To make relation, you will use 5 buttons on the right side of the text view. A number of CSV column configure on this screen and CSV files column count must be a same.
  • Add button makes relation of CSV column and request parameter to the Web server. Following sheet will shows up when you choose the button.
  •   
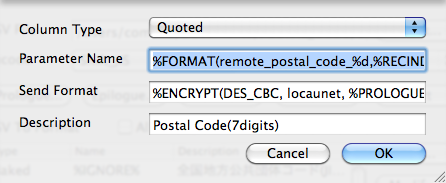
  • Choose Column type from Naked "no quote" or Quoted.
  • Set request parameter name into Parameter Name text field. If you need to change reuest parameter name dynamically, use functions and properties.
  • Set request parameter value into Send Format text field. If you want send column "AS IS" leave it blank. If you need to change reuest parameter value dynamically, use functions and properties.
  • You can put any comment into Description text field.
  • Modify button modifies relation of CSV column and request parameter to the Web server. Above sheet will shows up when you choose the button.
  • Delete button deletes relation of CSV column and request parameter to the Web server.
  • You can change the order of CSV Format and request parameter relation with Up button and Down button.